Additional common tasks with WorkZone I/O Manager
Create new modifiers (via HTTP request)
You can create request templates, using the HTTP modifier.
- In the Developer app, on the navigation panel under Servers (top left corner of the screen), click your web server name.
- Click Modules (on the bottom left side).
- Right-click the blank space in the center of the screen, and select Add > Input > HTTP.
- Configure properties of your request:
- General tab: provide Name.
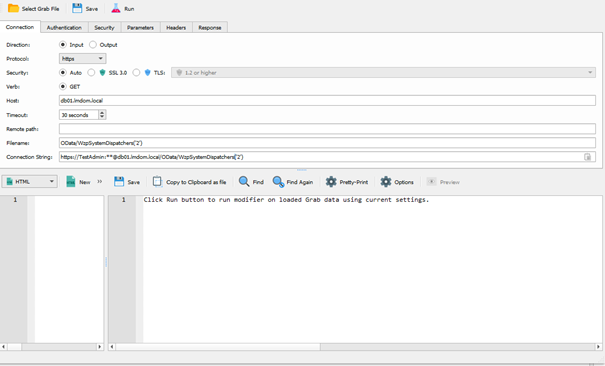
- Connection tab:
- Protocol: select http.
- Verb: should be equal to the request method
- Host: provide hostname (in the example below, it is
db01.lmdom.local) - Timeout: can be set as default
- Remote path: can be left blank
- Filename: should be partial path combined with the hostname (in our example, it is
OData\WzpSystemDispatchers(‘2’)) - Connection string: provide string used for ntlm authentication (on the example below, it is
https://username:password@db01.lmdom.local/OData/WzpSystemDispatchers(‘2’))

- Authentication tab: provide username, password and domain information.
- Response tab: select JobData.
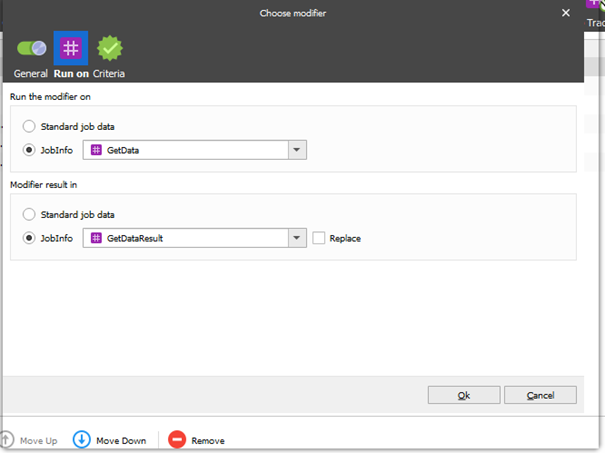
- Now you can add your HTTP modifier to the Pass-Through task. Double-click on the Pass-Through task, select the Enter modifiers tab and click Add. The Choose modifier dialog box will be displayed.
- Specify the following details:
- General tab: Select your HTTP modifier from the Name droplist.
- Run on tab:
- Under Run the modifier on, select JobInfo, and enter
GetDataas name. - Under Modifier result in, select JobInfo and enter
GetDataResultas name.
- Under Run the modifier on, select JobInfo, and enter

Create new modifiers (via scripts)
You can also add scripts to manage your requests and responses.
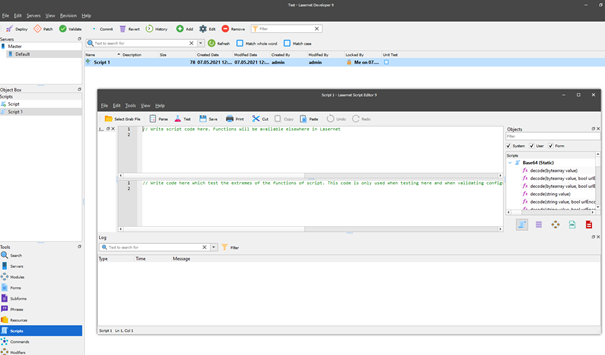
- In the Developer app, on the navigation panel, select Scripts (bottom left corner of the screen).
- Right-click the blank space in the center of the screen, and select Add.
- Enter the name of your script, and click OK.
- Select your created script (on the left pane), and click Edit.
- Add the needed JavaScript code inside the script, and click Save.

Tip: Click Test to check that your code is correct and can be compiled.
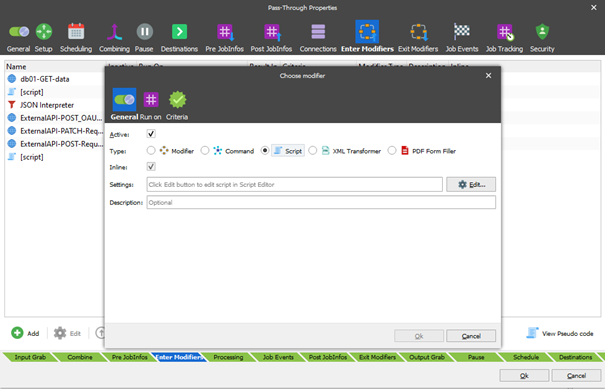
- You can also add your script to the Pass-Through task:
- In the Developer app, on the navigation panel under Servers (top left corner of the screen), click your web server name.
- Click Modules (on the bottom left side).
- Double-click your Pass-Through task, then select Enter Modifiers > Add.
- Under Type, select Script, and select your script's name. Now you can open and edit your script as needed.
- On the Enter Modifier tab, place your script to be triggered as a second subtask.
- Optionally, you can add a third subtask such as HTTP modifier, which will use updated
UpdateDataJobInfo as a default body and can be used for external API. - Click Ok.

For HTTP modifier, which uses
GetDataandGetDataresultJobInfos, you can use the following script:
It will send the request with empty GetData and try to take response data from
GetDataResult:var fieldValue = job.getJobInfo("GetDataResult", i);
Then it will try to find specific value from the response data:
var fullValue = fieldValue.match("Description>(.*)</d:Description");
var value = fullValue[1];
If found, it will be send to UpdateData JobInfo using code:
var fieldValue2 = job.getJobInfo("UpdateData", 0);
var value2 = fieldValue2.replace("LocalPrint19", value);
job.setJobInfo("UpdateData", value2);
And in the end the script will also verify if the data is present:
var fieldValue3 = job.getJobInfo("UpdateData", 0);
logger.logEvent(400, "Updated: "+fieldValue3);
All infos will be saved to your logs (on the Monitor tab).


Save changes (create a commit)
-
To save your changes, click Commit. A new window will appear with the list of all your changes.
-
Optionally, enter the commit info message.
- Click OK to save the selected changes in your setup.
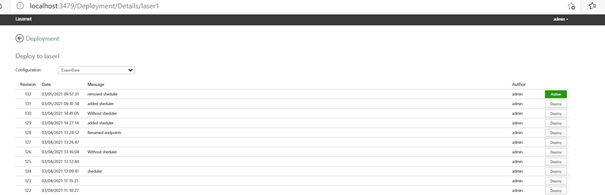
- Under
http://localhost:3479/Deployment, click on your web server instance to see all of your changes. - To deploy only specific changes, click Deploy next to this commit (their state will change to Active then).

Start a workflow
Once your changes are saved and workflow is ready, you can start web server by the request in Powershell:
Invoke-WebRequest -Uri http://(ifLocalhostPleaseUseComputerName):8082/webinputport/WebServer1/ -Method POST
The web server will be started and will trigger the Pass-Through task. Now you can navigate to the Monitor application.
Here you can check if the web server is started and if there are any errors or warnings.
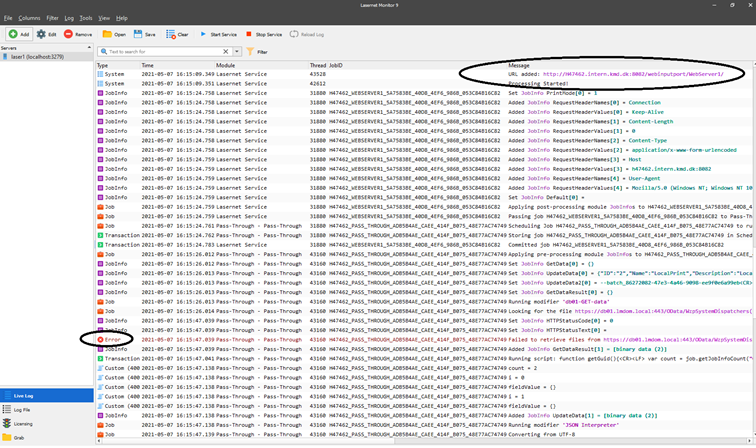
On the screenshot above, the Pass-Through gets request as one of its sub tasks, but the https://db01.lmdom.local:443/OData/WzpSystemDispatchers/... webpage is not responding.
You can also see here output and other information for your Script sub task.
Important:
Your license must be valid. Otherwise you will not be able to start the web server via a Powershell request. You can check your license via Lasernet > License Manager, or Lasernet > Lasernet Monitor > Licensing.
Add a scheduler
If you want to repeat the Pass-Through tasks after some intervals, you can do that by configuring a scheduler.
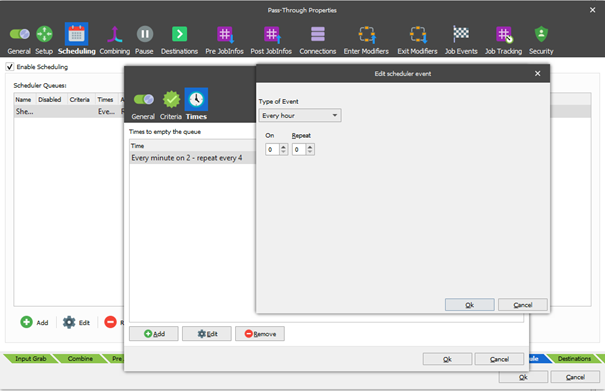
- Select the Pass-Through task > Scheduling > Add > General.
- Enable the Re-schedule option to repeat the task all the time.
- Select the Times tab, and click Add.
- Specify how often to repeat the task. For example, start every hour and repeat every 10 minutes.

- Save and commit your changes.
Important: Remember to restart the service after each commit.
Deploy your changes on localhost:3479/Deployment/Details/OurServerName page and then trigger the web server as described in Start a workflow.